|
|||||||
| The Honda CA95 / Benly 150 Restoration The little brother to the CA160 in our family of Hondas |
 |
| Thread Tools |
|
#1
|
||||
|
||||
|
I thought that this would be such a common question that I did a "Search" using the "Search link" above and typing in: Rear Wheel Removal and got two different hits, neither one of which dealt with my question.
I have a copy of the very extensive CA95 Manual that was recently posted and the section that deals with the question seems to be less than totally complete in it's scope and instructions. Has anyone done a comprehensive post on an effective, accurate and detailed instruction on the process (hopefully with photo's for a non-technical new nurd)? And if so, could you provide a link to the location or site? I want to take the wheel off so I can polish the rim and spokes and check the condition of the drums, shoes and bearings,etc. The downside of this question is that once I am finished with the rear wheel, I'm sure I will have the same question for the front wheel when I'm ready to remove it and polish it's rim, spokes, etc. Thanks 
|
|
#2
 03-20-2012, 12:43 AM
|
||||
|
||||
|
I suspect that most of us have not taken the step-by-step photos of the rear wheel removal process that you're looking for. No matter, maybe if we start piecing together the steps others on the forum can fill in the gaps and you'll get what you need.
I'll start, then others can pitch in with advice and/or corrections. 1) Set the bike on its center stand ... but you probably already did this. 2) If your bike has the chain guard, begin by removing the two chain guard halves from the left side of the bike. There are 5 screws, circled below. 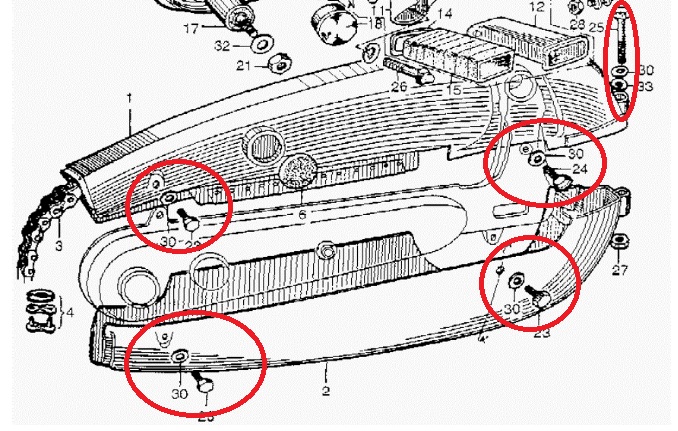 3) Now let's move to the right side of the rear tire, where in the photo below, my exhaust system has rusted and fallen away for your convenience. In the blue circle, back off the brake rod adjuster nut completely so it can be removed. A deep well socket is handy for this task. In the green circle, remove the bolt from the brake torque link. Now you're almost there. In the red circle is the lock nut for the rear wheel adjuster. There will be one on each side of the wheel. Back off this nut a few turns to loosen it, then remove the bolt completely. 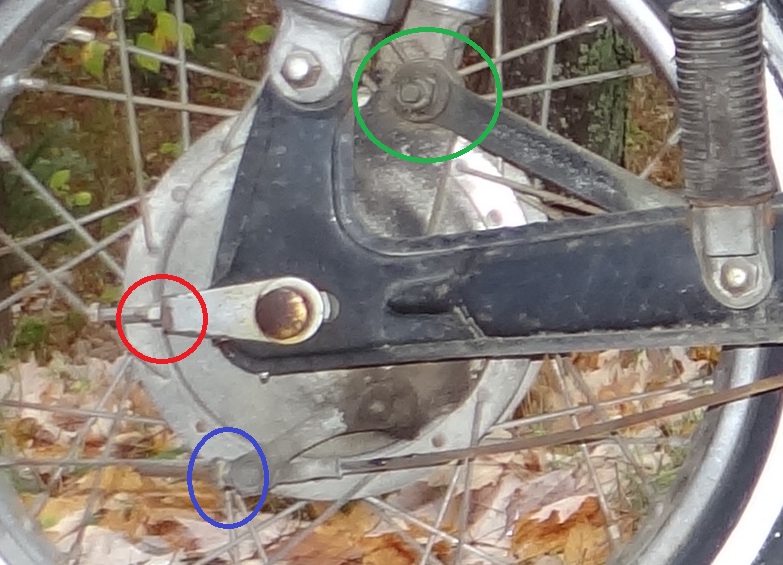 4) In the yellow circle below are a pair of nuts that retain the axle. Back off the outer nut completely, then do the same for the second nut. You may have to hold the right side of the axle to keep it from spinning. 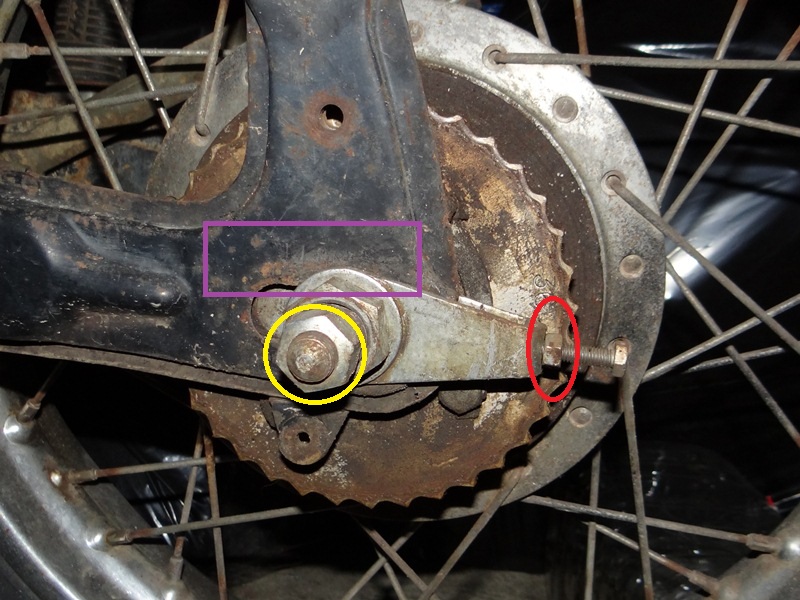 5) From the left side, tap the axle through the wheel. It may help to lift the wheel a bit as you do this to relieve the weight on the axle. The wheel should fall free. You'll need to unwrap the chain from the sprocket as the wheel falls in order to completely remove the wheel. I think that's about it. Oh yeah, in one of the pictures above is a purple box. You may notice graduations or 'hash marks' on the rear swing arm. These marks will help you align the rear wheel when you put it back on. I'm sure the others will have clearer advice, but when you put the rear wheel back on and the chain is in place, adjust the left side adjuster first to get the chain to the appropriate tension, then adjust the right side to the same number of hash marks that the left side has. Your wheel should track fairly straight, but a visual check will confirm that. Last edited by ByTheLake; 03-20-2012 at 12:50 AM.
|
|
#3
03-20-2012, 07:18 AM
|
|||
|
|||
|
And now the easy way
 sorry BTL sorry BTL  Disconect the brake linkage and its anchor (this is upside down in BTLs picture) remove the smaller of the two chrome nuts on the spindle. The spindle should then knock through. The spacer near the brake plate will fall out and the brake and wheel can be removed without disturbing the chain. Sam. 
|
|
#4
03-20-2012, 07:46 AM
|
||||
|
||||
|
Quote:
Thanks for the comments, Sam. I figured that once we got the discussion going, the good stuff would get flushed out. So, based on what you described, the easy way would leave the rear end as its pictured in the service manual: 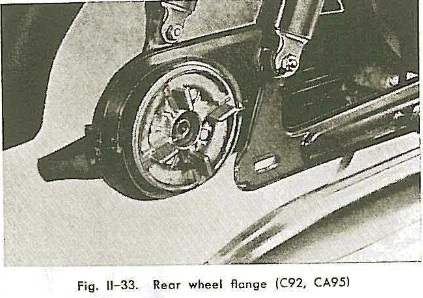
Last edited by ByTheLake; 03-20-2012 at 07:56 AM.
|
|
#6
03-20-2012, 11:26 AM
|
|||
|
|||
|
Holy frijoles Sam, I think you just made the Benly the easiest bike in the world to disassemble. Because I had thought the rear wheel set up was, the most unfriendly design ever conceived...with that big slap of know how; I doubt if there is an easier bike to deal with now. The thought had crossed my mind before; but I didn't try it as with my luck; there wouldn't have been clearance:P So I did it the hard way nice to know it works
It might also help to mention the rear brake linkage can be removed faster, by removing the clevis pin and bolt at the brake pedal, than at the blue circled adjustment nut shown in the photo above.
|
|
#7
03-20-2012, 12:16 PM
|
||||
|
||||
|
Thanks for the quick response guys. I will probably follow "By the Lakes" systematic instructions and that is the way my brain is geared.
"Sam's" easy removal suggestion as well as "Jetblackchemist'" suggestions may well be incorporated at some later time, but now will go with the approach suggested by "By the Lakes." Thanks for the help. Dick E
|
|
#9
03-22-2012, 01:49 PM
|
||||
|
||||
|
I have four photo's of my CA95 that I took this a.m. before I removed the rear wheel, as per "By The Lakes" very accurate instructions. Thanks to his and everyone else' help.
Is there someplace on this site or anyone reading this who can instruct me on taking the four images off of my "thumb drive" from a computer remote from my home and posting them on this site? Thanks, Dick Evins
|
|
#12
03-22-2012, 03:04 PM
|
||||
|
||||
|
Thanks for the comment. I tried, unsuccessfully, to amend the post with the photo's and state that most of the clutter around my bike are some of my antique fans that are awaiting my attention. The less impressive fans end up on the floor and the better one's get to rest on the top of the shelves until I get to them.
|
|
#13
03-23-2012, 12:09 AM
|
|||
|
|||
|
Quote:
Nice old fans and 6" bench grinder.Sam.
|
|
#14
03-23-2012, 07:02 AM
|
||||
|
||||
|
Quote:
|
|
#15
03-23-2012, 10:54 AM
|
||||
|
||||
|
Photo clutter is very interesting sometimes. I enjoy looking at photo's from before the 1950's and back to the civil war and using a magnifying glass to see what there is of interest in the background. Those fans on the floor are of the 30's and 40's era with simply steel or micarta blades (fairly ordinary).
One of the fans I'm working on is a 1906 Westinghouse with a 16" brass blade and cage that will be a beauty when I'm finished, as a birthday gift for my son.
|


