Page 1 of 1
Honda benly ca 95
Posted: Sat Jan 28, 2012 7:25 am
by ben1942
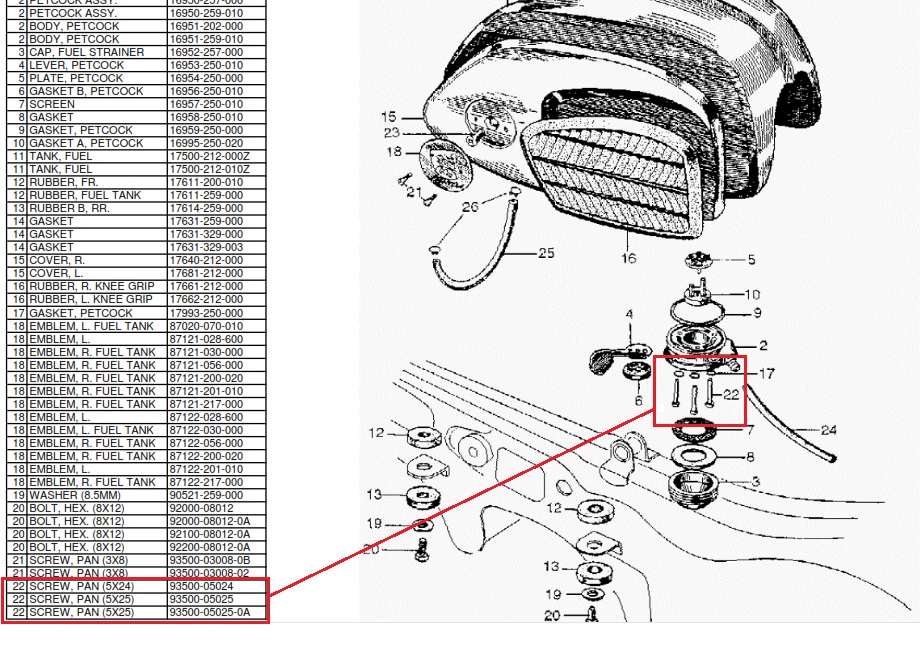
I'm going nuts trying to repair the petcock on my 1965 benly. I bought a repair kit off ebay and it dosen't work, pours gas like a waterfall seems like the washers are too thick. Also what size are the three screws that hold the petcock on? I know that they are JIS but what siza are they? Thanks in advance for any help, Ben
Posted: Sat Jan 28, 2012 9:13 am
by ByTheLake
Ben,
You probably already have this information, and I'm not sure if it's what you need, but here's what the parts manual has for the CA95 late edition:
-Kevin
Posted: Sat Jan 28, 2012 11:15 am
by ben1942
Thank You very much. This was driving me nuts. Ben
Posted: Sat Jan 28, 2012 9:40 pm
by Spokes
You can chase the petcock mounting threads with a metric tap the same size (5mm) with a standard metric thread pitch then use new screws. Make sure that the seal surface on the tank is smooth. Damage left behind left by corrosion will not seal. Another leak maker is a weak cross spring. It's the spring that keeps the selector gasket "sandwich" tight. Also make sure that the aluminum housing is not too damaged. These old petcock are tricky to say the least.
Posted: Sun Jan 29, 2012 8:58 am
by ben1942
Spokes, Thanks for the info I appreciate it very much. They sure are tricky, I have three of them none which work decently. This one seems to leak from the selector arm but I'm not sure. Could it be leaking past the screws, the little red washers under the screws look dry and brittle.
Posted: Sun Jan 29, 2012 10:49 am
by Spokes
Yes, dry washers won't seal to well. You might find fuel resistant washers at your local lawnmower shop. If not, I have made the small gaskets out of fuel resistant automotive gasket material. I use a leather punch to make the small gaskets.
The kits that I have used have a rubber washer. So far the washer has the wrong size holes and do not fit well in the petcock body. Use a small Tool & Die round file and open up the holes. I actually prefer the cork washer. Also make sure the selector arm is absolutly smooth and ding free.
Thanks Spokes!
Posted: Sun Jan 29, 2012 6:17 pm
by ben1942
My selector arm needs to be smoothed out. I see some rust on it and thanks for the tip on the washers. I went out and bought a metric tap set so I can chase the threads to regular metric. I'll be off to the mower shop in the morning.
Posted: Mon Jan 30, 2012 4:22 am
by rhodemon
And don't forget to soak the cork washer in STP over night!
Posted: Mon Jan 30, 2012 6:31 pm
by Smithers
In case you haven't searched around for info on this forum for tips and tricks check out these threads.

Posted: Thu Feb 02, 2012 1:47 pm
by ben1942
SPOKES, Thank you! followed your advice and the petcock works perfectly. I used a Dremel with a brass wheel to clean it up. Ben
Posted: Thu Feb 02, 2012 1:49 pm
by ben1942
Also to Smithers a big thanks for pointing me in the right direction. Ben
Posted: Fri Feb 03, 2012 11:22 pm
by comp_wiz101
Smithers wrote:In case you haven't searched around for info on this forum for tips and tricks check out these threads.
Cool, a thread I started is now reference material
Posted: Sat Feb 04, 2012 4:50 am
by ByTheLake
comp_wiz101 wrote:Cool, a thread I started is now reference material
You are but a tiny footnote in the bibliography of life.
Posted: Sun Feb 05, 2012 9:30 am
by Smithers
Yeah this pesky little fuel switch is crucial to riding these bikes and sleeping soundly at night!

We have all lost sleep over these silly things. The gaskets in them need to be soaked in STP or oil before you assemble them so they will be expanded and ready to seal the fuel. I have put together a few of them only to have them leak a drop every 5 minutes which is enough to evaporate without pooling up. I leave them on and the next day the leak will have stopped.
Patience my friends!!