|
|||||||
| The Honda CA95 / Benly 150 Restoration The little brother to the CA160 in our family of Hondas |
 |
| Thread Tools |
|
#46
|
|||
|
|||
|
Actually the Thai BMW style pipes are not that bad. You will notice that the Thai exhaust pipes at the head are slightly different. You will notice that the original pipes have a smooth bend and the Thai pipes have a slight fold. The fold makes the exhaust flanges hang up at the fold. So you need to dremmel the opening of the flange and lubricate the pipe to avoid scratching your new chrome.
I suggest using a light application of fiberglass matting at the back of the damaged metal. As soon as the fiberglass is rigid and tacky, mix 1/3 fiberglass resin and 2/3 body filler together. Add both hardeners at their appropriate measures for their volume. Mix this resin/filler mixture in a Dixie cup. Within 3 minutes, pour the mixture in the voids to bond deeply with the glass and metal. Allow to cure 24hrs. Finish the body work as normal and paint. This is my secret to repairing damaged metal. The example below shows major deep rust damage. After my resin/filler technique followed by standard body finishing. 
|
|
#47
 02-13-2014, 05:48 PM
|
||||
|
||||
|
That is one nice looking frame Spokes... I will try your recipe.
Amazing how that came out, better than factory. Thanks for the tip! As I'm assembling the engine I realized I don't have a starter lead wire. The part number is 32401-201-000 which I haven't found on ebay yet. I see other starter wires out there for CA175 and CB77 models, would those work for a CA95? Thanks!
__________________
http://s262.photobucket.com/user/col...?sort=2&page=1
|
|
#48
02-13-2014, 07:30 PM
|
|||
|
|||
|
The CA175 battery cable will work. It's a little longer than the CA95, so curl the excess cable in the body cavity of the frame after attaching (before tightening)the starter solenoid. Once the solenoid is mounted to the frame reach in the frame and tighten the contact nut while positioning the cable out of the way.
|
|
#49
02-15-2014, 06:02 PM
|
||||
|
||||
|
I ended up finding some CA95 cables, used but in good condition.
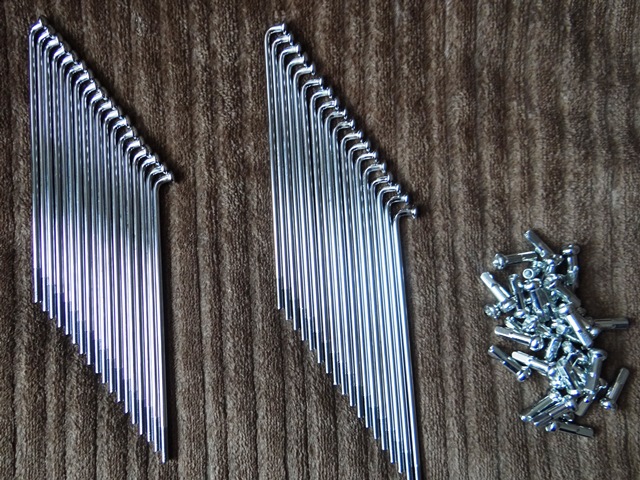
This site is great... I wouldn't be able to rebuild this bike without all the help and information here. I really appreciate answers, recommendations and advice. Here's another question I couldn't find an answer to; what is the threaded hole for in the picture below? What am I missing?  Also, thanks to ByThelake (Kevin) for sharing his photos on how to lace a wheel which taught me how to do these.   Now they are off to the bike shop for tire mounting. Thank you
__________________
http://s262.photobucket.com/user/col...?sort=2&page=1
|
|
#50
02-15-2014, 06:22 PM
|
||||
|
||||
|
For the wheel lacing, I used the video that Oakey's Garage posted on YouTube.
http://www.youtube.com/watch?v=ENrRl2FyNTw He actually uses a CA95 wheel as his example, so it was easy. Doug, did you separate the spokes based on the angles of the bend? There are two different bends, and I wouldn't have known that without the video. From what I can see from my photos, nothing goes in that hole, and mine doesn't appear to be threaded, but I can't completely verify. It's quite close to the clutch basket, so there's not much room for anything anyway. 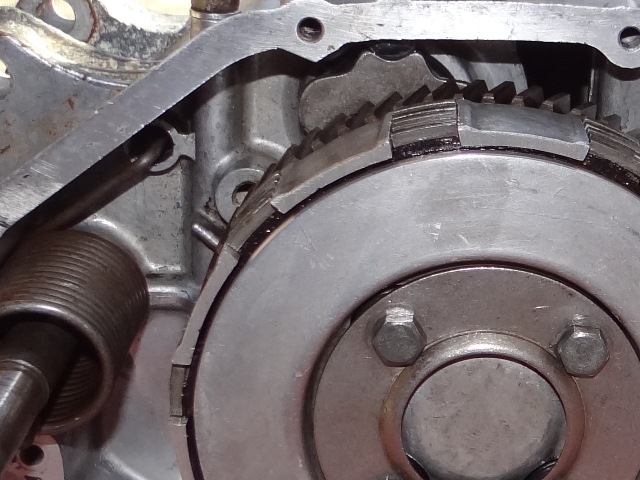
|
|
#51
02-15-2014, 08:28 PM
|
||||
|
||||
|
Doh!!! No, I didnt look at the spokes to see if they had a bend. Back to the shop and intercept these before they try balancing them and putting tires on.
Wish id seen that youtube vid sooner 
__________________
http://s262.photobucket.com/user/col...?sort=2&page=1
|
|
#54
02-27-2014, 06:03 PM
|
|||
|
|||
|
Looks like your making great progress wiht your bike . For some odd reason upper chain guards are easy to find and lower guards are like hen's teeth . Your lower guard can be repaied though . Cutout the rusted metal and weld in new metal .
Last edited by kartgreen; 03-01-2014 at 07:37 AM.
|
|
#55
02-27-2014, 06:21 PM
|
||||
|
||||
|
Thought I'd post a few progress pictures
And of course ask a few questions  Engine done for now ( a few screws need replacing)   Someone hit a pot hole?  Getting the bends out  This is my first attempt at body/paint work, seems like a lot of bondo huh?  And of course the picture with the question and real reason why I got on to post. ") My starter switch is missing this nut and screw. On the back side is a type of band spring that fits in a slot. I'm missing at least the screw and nut, maybe more. It doesn't appear the hole is threaded so I'm not sure how the nut is held in place. Any advise greatly appreciated. Thanks! 
__________________
http://s262.photobucket.com/user/col...?sort=2&page=1
|
|
#56
02-28-2014, 04:22 AM
|
|||
|
|||
|
The small spring, screw & nut is a dampener. I may have extra's and can check my many small parts drawers if your interested. There is no harm if the screw is missing, just a little slop in the throttle handle.
I imagine that people loose this screw through vibration and/or remove it at the first signs of the throttle not retracting when let go.
|
|
#57
02-28-2014, 08:42 PM
|
||||
|
||||
|
Spokes, thank you for reply and offer. I'll give it a shot without the screw and see how sloppy it gets. If nothing else I suppose I could make something up now that you explained the function.
Being new here I dont want to be asking for parts but do appreiate the offer
__________________
http://s262.photobucket.com/user/col...?sort=2&page=1
|
|
#59
03-05-2014, 06:10 PM
|
||||
|
||||
|
Thank you Kevin... I'm still not sure if I'm up to painting it myself though.
There is a lot of work restoring these bikes (as you know) and afraid I might mess it up. On the other hand, it's just paint and could always start over. I'll weigh it out and decide after all the primer gets shot and sanded. You guys all set the standards high with your beautiful restorations! Here's a few update pics   Are the HONDA letters supposed to be black?  
__________________
http://s262.photobucket.com/user/col...?sort=2&page=1
|
|
#60
03-07-2014, 08:11 AM
|
|||
|
|||
|
Looks like your taking the time to do it the right way . There's a great satisfaction knowing you've resurrected at 45 year old bike that many people have never seen before .
Don't be afraid to do your own paint work , take your time let everything dry and start wet sanding and then polish and wax and you'll be amazed at the finished product . Most automotive paint suppliers can custom mix paint colors into spray cans . They even do 2 stage paint and clear .
|