|
|||||||
| The Honda CA95 / Benly 150 Restoration The little brother to the CA160 in our family of Hondas |
 |
| Thread Tools |
|
#16
|
||||
|
||||
|
Quote:
Could someone please recommend a sprocket combination? Since the front and rear sprockets are worn out and I need a new chain, what tooth counts would be a good match up for speeds under 50 and mountain driving? Thanks!
__________________
http://s262.photobucket.com/user/col...?sort=2&page=1 
|
|
#17
 01-24-2014, 12:16 PM
|
||||
|
||||
|
Well, the "speeds under 50" part won't be a problem.
These little engines don't have a lot of grunt, so if I recall Sam's previous feedback correctly, its typically best to stick with the stock ratios. The rear is 36 teeth, and I count 14 teeth on my original front sprocket.
|
|
#19
01-24-2014, 05:37 PM
|
||||
|
||||
|
Thanks guys... 14/36 sprockets and a 428-120 link chain it is.
Speaking of chains, is it standard to change out the cam and starter chains when rebuilding an engine? All the body parts were dropped off at the metal stripper today. Fuel tank gets a chemical bath, the rest media blasted. $110 for everything.. not too bad. Head is getting a valve job and should be ready next week. Hope to start putting the engine back together by next weekend. In the meantime it's scrubbing little parts like the starter, polishing aluminum and reading as many of the threads on this forum as I can  Was this a green, white or red bike?  That lower cover is going to require some help. Will break out the welder to patch in new metal once it comes back from the metal stripper.  Disassembled starter 
__________________
http://s262.photobucket.com/user/col...?sort=2&page=1
|
|
#21
01-24-2014, 08:15 PM
|
||||
|
||||
|
And yes, I ALWAYS replace the cam chain. Starter chains are much easier to get to for repair. Both are 219 sized and master links are the same.
L
|
|
#22
01-26-2014, 06:33 PM
|
||||
|
||||
|
Got a few things done this weekend.
The starter went back together.  Oil pump was full of gunk and the check balls were stuck. Bit of a panic briefly. I use a plastic oil change pan to clean parts in the garage then take them in the house and rinse in hot water. When putting this back together I realized I dumped the check valve spring down the drain. Thank goodness my wife didn't run the disposal. With a flashlight and telescopic magnet it was found and retrieved.  Here's some (not all) of the painted parts getting ready for the oven. Takes 1 hour at 200 degrees to cure. The head is getting a valve job, so MIA. I'm replacing that top case, it's just too corroded and the replacement will be here in a few days.  I mentioned earlier all the wires had been chewed by mice so I needed a new stator. Picked one up on ebay but noticed a few variations in the way it's wired. Also the part numbers are different. Wondering if I should splice the harness onto the old stator or if it's ok to use the ebay one. What do you all think? Notice part number's being different   The key showed up for the ignition, it worked! Again... thanks for the tip on where to purchase NOS keys! I'm guessing not all five of those indicator marks were painted red and will research what colors those dots were... also what the positions stand for. 
__________________
http://s262.photobucket.com/user/col...?sort=2&page=1 Last edited by Colorado66; 01-26-2014 at 06:39 PM.
|
|
#23
01-27-2014, 03:11 AM
|
||||
|
||||
|
Nice job with the starter. Did you give it a test? You can toss a set of jumper cables on it and hook it to a 12v car battery for a quick test - it should pounce to life.
The corroded part of the upper case would be covered by the carb shields, if you choose to use them. My engine was the same way. I'm assuming it was where the mouse nest rested on the engine. The mouse urine eats away the aluminum. Regarding the 'wire ends here' portion of the new stator, I downloaded your picture from Photobucket and zoomed in for a closer look. If I'm looking at the same area, it simply looks like the wrapped inner windings - I didn't see anything that appeared to be cut or damaged. These key switches are needlessly complex, serving as the headlight/tail light switch, too, among other things. Here's a picture of my switch, along with a shot of the manual that describes the settings. The colors of the switch dots aren't important, but rather the positions are. 2nd dot from the bottom is 'off', moving one dot up is the regular running position (with no lights), etc. 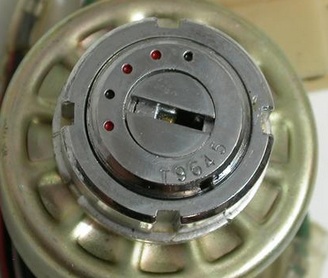 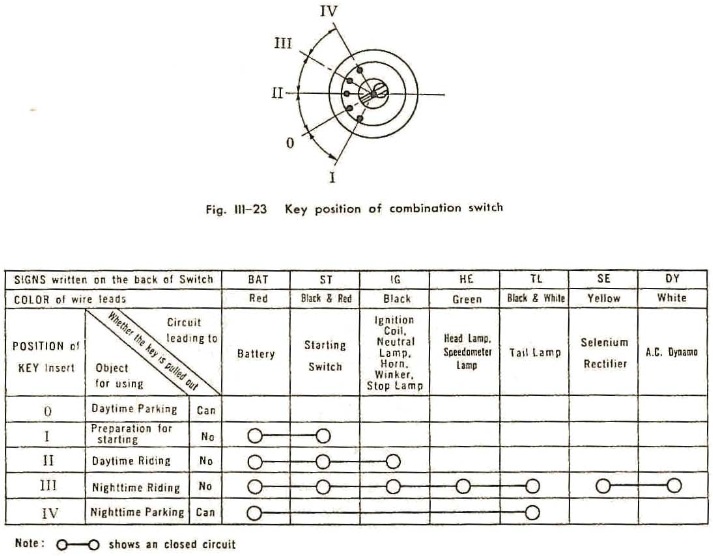
|
|
#24
01-27-2014, 05:30 PM
|
|||
|
|||
|
Great job! It's always a pleasure to watch another CA95 come back to life. I want to make an early suggestion regarding the clutch actuator. I struggled with stiff clutch syndrome with a couple of my builds, especially with my build from scratch project. The solution was to dress the "auger" portion with a burnishing wheel. Now my clutch is dream easy. So before you reinstall the clutch actuator mechanism make sure the "auger" portion has no sharp edges or burrs.
|
|
#25
01-27-2014, 06:02 PM
|
||||
|
||||
|
Quote:
What does your burnishing wheel look like? I use cotton buffing wheels, and wire wheels, but a Google images search on burnishing wheels turns up all sorts of different types.
|
|
#26
01-27-2014, 06:32 PM
|
||||
|
||||
|
Thanks for all the advise and suggestions!
BTL... that ignition diagram is great... very helpful, thank you. So I did as you suggested and hooked up the jumper cables to the starter.... it buzzed to life... it works Also, I beleive you're right on that winding wire, appears to be a factory dead-end wire. So I'll try the newly acquired stator in the build. Spokes... I know this is a stupid question, but what is the clutch actuator? Do you have a picture or part number so I can look it up? I'll certainly take the recommendation and burnish/polish any burrs off. Also, here's that new front sprocket... much nicer than the old one. Amazing how much was worn off and the uneven wear. At first I thought it wouldn't fit because the center grooves weren't as deep as the original, but it fits like a glove and has clearance for the sprocket plate. 
__________________
http://s262.photobucket.com/user/col...?sort=2&page=1
|
|
#27
01-27-2014, 07:16 PM
|
|||
|
|||
|
The clutch actuator looks like this
I got this pic from ebay, BTL, This is the wheel I'm referring to:http://www.drillspot.com/products/60...onvolute_Wheel I have a used burnishing (deburring) wheel you can have. It still has some life in it and you will need to use a bushing to fit your grinder/buffer. PM if your interested. Tool & Die at the shop refers to this wheel as a burnishing wheel. Last edited by Spokes; 01-27-2014 at 07:19 PM.
|
|
#28
01-28-2014, 03:15 AM
|
|||
|
|||
|
Hi Colorado, you need to be careful mixing crankcase halves, they are very hard to match.
When the cases come out of the casting shop, they are bolted together and line bored for the crank and gearbox holes. They then go on another machine that trues the side mating surfaces for the clutch cover and generator housing. I guess that every so often a tool will break and the machine will be reset Which will cut a perfect surface but not exactly the same as the previous one, two halves from different motors can be miles out, ask me how I know.  When you get the replacement top half, bolt the two together and check the side mating surfaces for flatness at the joints front and back then try again with the crank and gearbox in, these holes can also be miles out and the two halves won't seal. Sam.
|
|
#29
01-28-2014, 06:05 AM
|
||||
|
||||
|
Quote:
|
|
#30
01-28-2014, 09:16 AM
|
||||
|
||||
|
Now I'm glad I bought the entire case (upper & lower)
The engine numbers are 2,893 builds apart. CA95E-500-9717 (currently) CA95E-500-6824 (new purchase) So should I be OK using my internals in the new case? Anything else I should look out for using a different case? Thanks for the help... I'm going to need a lot more
__________________
http://s262.photobucket.com/user/col...?sort=2&page=1
|


