|
|||||||
| The Honda CA95 / Benly 150 Restoration The little brother to the CA160 in our family of Hondas |
 |
| Thread Tools |
|
#1
|
|||
|
|||
|
With all the rain we have been having I was able to find some time to start tearing into my bike. Since I am sure I will be having plenty of questions I decided to start an engine rebuild thread for my bike. The first order of business was to pull the engine and pop the top end off to have a look see at the rust I could see in the right cylinder. The engine came out very smooth and easy. I put the pike up om the center stand and pulled the foot peg bar and loosened all the side cover screws, the carb, and the starter( the bike came to bme sans and exhaust system). I pulled the oil drain plug and discovered that there was no oil in the engine, so I placed a floor jack under the oil drain and it ballanced beautifully as I pulled the engine mounts and dropped it.
The engine came apart easily and all the top end parts were clean and dry and all the gaskets are new. This confirms one of my suspicions that the PO did a top end rebuild but never fired it up after the rebuild. One slightly disapointing side note is that the carb was not rebuilt by the PO. It is in good cndition but I will need to locate a carb kit. Any sugestions for a good vendor? How is Ohio Cycle for quality and price?  Not sure if youyu can tell from the pic but the rust is jusst surface rust but I would still like to pull the valves to check the seats. It looks like a valve job was done and that the seats were lapped before the cylinder got water in it so it should be more of a touch up valve job than an actual valve job.  The pic of the cylinders looks worse than it really is. I think I have a cylinder hine for my 89cc chain saw and that might work for this. I didn't see any honing swirls and I havn't checked to see it the rings are new. But the fact that the rust is just surface and the cylinders look good is welcome news.  The inside of the case looks clean and unlike the top end it is coated with clean oil.  Not sure how well it shows up but the seem in the case has orange silicone gasket squeeze out which makes me think that the case was split. any one care to venture a guess if this means new a rebuilt bottom end or was it just split, cleaned, and put back together. I am not wild about the amont of squeeze out I can see on the inside of the case, I can clean up the squeeze out on the outside but I kind of hate to split the case just because the Po was messier than I like with the gasket material. Any opinions/sugestions?   The damage to the rotor was done by the PO. The damage is on oposing sides and looks like it was done by a poorly placed wheel puller. I hate to put it back together but I have similar damage on one of my chainsaws and it spins at 9K with no problems. If I can find a better rotor to put back in I will, any offers? Robin 
|
|
#2
 03-24-2011, 06:05 PM
|
|||
|
|||
|
I got a chance to clean up and inspect the pistons, rings, and cylinders. There was a brief moment of panic when I saw .040 stamped on the top of one piston and .100 stamped on the top of the other. I had to actualy measure both pistons before I remembered that .040" is the rounded equivalant of .1MM. I rarely ever saw metric drawings when I was worked as a patternmaker so my imperial to metric equivalants are not nearly as solid as fractional to tenths of an inch are in my memory.
The rings all spec out on the tight in of the range at .008" with a couple at .006". using a good light and a magnafying lens I can see honing marks in the cylinder. the light rust in the left cyinder cleaned up with out any piting but it did leave a faint dark stain. Since the rings are tight I think I will do a light hone on both cylinders. I pulled the cam and rocker arms and they had a light coat of oil on all the mating surfaces. I might go back out after dinner and start on pulling the valves. I'm not brave enough to try the Smithers trademarked method of compressing springs so I will have to see what else I can rig up. Robin
|
|
#3
03-25-2011, 01:02 AM
|
|||
|
|||
|
Hey Robin, If it was me, I'd split the cases and remove all the the surplus sealant. If there's as much on the inside as there is on the out, It'll eventually find its way to the oil pump screen and cause a blockage.
Just out of interest, what's that thing sticking out of the end of your crank shaft, the thing with splines on the end.  Sam. 
|
|
#5
03-26-2011, 06:41 AM
|
|||
|
|||
|
It's not a big deal to split the cases. Split the case with the engine up side down and assemble the same way. Take some pics while your doing it if you feel unsure about the reassemble. It would be good to check the excess sealant as Sam points out and check the transmission gears.
Be sure to replace all of the oil seals even if you don't split the cases.
|
|
#6
03-26-2011, 11:23 AM
|
|||
|
|||
|
Last night I poped the valves out and checked the guides and stems for excess wear. The specs in the PDF manual are a bit wonky as far as the metric to imperial conversions and the tollerance on the valve guides seems a bit tight. Even so all my parts are within spec which makes me happy.
I will admit I am a little intimidated about spliting the case, even though I kind of knew it was what needed to be done even before Sam confimed my suspisions. I have rebuilt a lot of top ends and countless carbs on various engines but I have never done a bottom end. Having the cam over head and already delt with does make it a bit less intimidating. Today I will start on cleaning the outside of the case and splitting the case. I made the mistake of polishing a small spot on the outside of the case "just to see how it would look" I really like the way it looks so now the only other hard decision I need to make is what to do about the hardware. besides replating or buying all new what other options would look good with a polished case? Robin
|
|
#9
05-03-2011, 06:31 PM
|
|||
|
|||
|
thought I would update my progress. My shop is actualy a wood working shop and a rather small one at that. Just as I was getting ready to split the case I needed to start on a commision for a bed. Luckily I won't be needing my drill press for this project so I can leave the engine where it is. My drill press is an industrial radial arm with a 24" square table that weighs 150 lbs ad the legs add another 100lbs so if I swing the drill head to the side it makes a really nice work table that is about the perfect size for a ca 95 engine.
the problem with doing mechainc work in a wood shop is the dust. I can control it a bit by covering the engine when I am not working on it. My bigest problem is somtimes I can go a few days without squessing a few minets to soend on the engine. for that reason I decided to concentrate on cleaning an polishing parts until I can get a weekend to split the case and put it back together. I opted to wirebrush anything with fins rather than paint it or polish it like I will the case. I am happy with how things have turned out so far but I may change my mind when I see these parts next to case once it is polished.  I should have know better than to use my fordom grinder on the cylinder head. I just couldnt resist the temptation to clean up the ugly casting lines on the ports. with the head compleatly stripped down I just just seemd to make sense. I;m not doing any major grinding, just cleaning things up and rounding over the sharp edges on the valve seats. Before  after  Hard to see much from this angle, but the original machining was pretty ugly looking. I still need to do a bit more clean up with some fine rifflers but it looks a better than it came from the factory.  Robin
|
|
#11
05-16-2011, 07:51 PM
|
|||
|
|||
|
I'd love to blame my lack of progress on waiting for a gasket set and bottom end seals, but the truth is, between it being the end of the semester and the furniture commision I have going in my shop I am lucky to find a few minutes each day to do a bit polishing or parts cleaning. On the bright side I suppose it allneeds to be done, I was just hoping to stay focused on rebuilding the engine.
Any recomendations on a supplier and/or brand of gasket set and seals? Robin
|
|
#12
05-16-2011, 09:02 PM
|
||||
|
||||
|
THO makes most of the seals out there and they are OEM I think. Super common. As far as gasket sets I just bought a set from Thailand and they are just as good as any others out there. I got my second set of pistons and rings from Thailand along with those gaskets and the worked well. They are called "Gold Wing" gasket set just like this one: http://cgi.ebay.com/ebaymotors/GASKE...Q5fAccessories
I just made sure to use a credit card connected to my Paypal account when I bought 'em. That way I could surely just make a call and get my money back if I got scammed or got the wrong product sent to me "accidently". As long as the feedback is high (in the thousands at least) of the seller I wouldn't worry too much. They like to use multiple accounts to make small purchases back and forth to boost their feedback ratings so a couple hundred 100% feedback doesn't mean anything to me.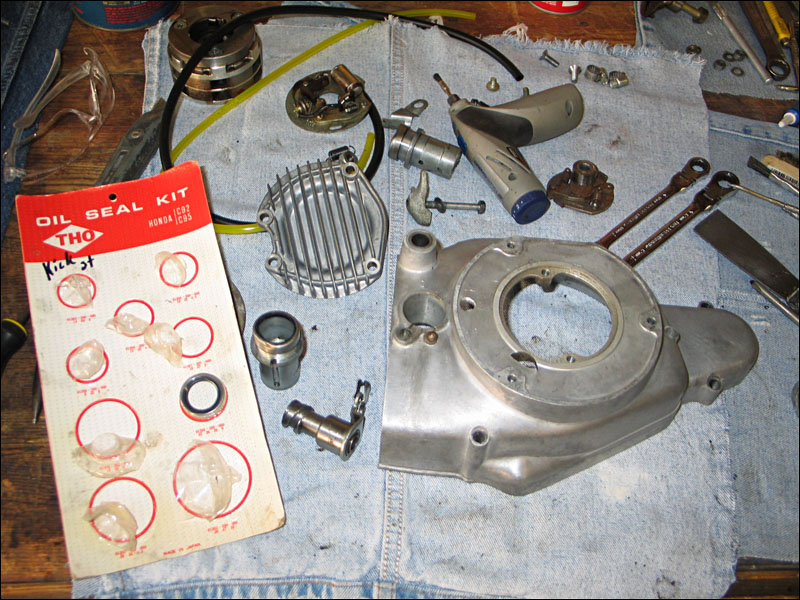
|
|
#13
05-17-2011, 09:16 AM
|
|||
|
|||
|
Looks like someone maybe got inspired by my port polishing query, its made me want to do some

|
|
#14
10-18-2011, 07:42 PM
|
|||
|
|||
|
hello everyone,I'M THINKING ABOUT REBUILDING AN extra ca95 motor I have in my basement this winter? Is the transmission part of the motor rebuild? would that be considered bottom end/ the top end is motor...my current motor seems strong although I have serious oil leakage? at least in three diff.. places?
|
|
#15
10-18-2011, 07:50 PM
|
||||
|
||||
|
The transmission isn't really something you need to rebuild at all. It's just a good idea to take the lower and upper pieces apart in order to clean it out. Also you want to make sure and take out any sludge that might have built up inside there over the years. Then you want to pour some oil inside to lubricate the bearings (by spinning the crankshaft a little and moving the connecting rods around before you put it back together.
This is just a good idea to ensure that everything is nice and clean before you run your engine after a rebuild. And since parts are so expensive and hard to find it's a great idea to check inside for contamination before starting it up. It's not very hard at all. Bottom end = cranks shaft + connecting rod Top end = cylinder + pistons and everything north of that area Where the cases join you could have some oil leakage but I can't see it with my own eyes so I'm just guessing. An engine gasket kit isn't very expensive and you get every one you would need. Also an oil seal kit is a great investment if you don't like oil dripping from your engine.
|


