|
|||||||
| The Honda CA95 / Benly 150 Restoration The little brother to the CA160 in our family of Hondas |
 |
| Thread Tools |
|
#1
|
|||
|
|||
|
I own a motorcycle shop in Wichita, KS and have wanted one of these CA95s ever since I worked on a 1964 a few years ago. It was kind of the guinea pig that would lead me to my own nightmare restoration. That bike needed an entirely new wiring harness which I made by hand, a new clutch, new gaskets all around, and some carb and head work. So armed with this knowledge I found a CA95 which I believe to be a 1964, and was able to obtain it for free on the condition that I get its barn buddy, a CB200, running again (which I have already done!).
So, here it is on the day I got it back in July (note the chrome bulldogs on the sidecovers! Why one earth would anyone do this?! I'm keeping them on there though  ) ) After some elbow grease:  The motor was completely frozen when I obtained the bike. Filled the cylinders up with silicone lubricant, let it sit for about 20 minutes, and with a wrench on the flywheel very easily broke it free. Pulled the engine out, and ripped the head and cylinders off to see the damage. Not too bad of a seize, and I probably could have run it, but I always say if anything's worth doing it's worth doing right, so I had the cylinders bored out to second over (.50) The rest of the motor looked as you'd expect. The valves weren't the worst I'd seen, but were in definite need of some love and care  Shined them up and then lapped them  As the project currently sits, I'm just trying to get it running so I can ride it around next year. Next winter I plan on completely disassembling the thing and getting it back up to 100%. Unfortunately, the CA95 has to share project time with a '66 CB160 cafe racer that I'm converting over to use a monoshock from an R6 currently. So, it will be slow going but I'll be on here frequently whenever I get the chance, and this site has already been a big help with some engine work I've had to do so thank you all for that! The last thing I did to the bike was attempt to get the cam chain and cam sprocket on without removing the flywheel and stator. I don't think this is going to happen. I got frustrated and gave up haha. And to end this long introduction, I got a never issued Kansas tag for it. Even came with the registration info for the tag!! 
Last edited by Noobens; 12-17-2011 at 04:05 PM. 
|
|
#2
 12-17-2011, 06:00 PM
|
||||
|
||||
|
Noobens,
Thanks for sharing the story and the pictures. Those bulldogs are the best! I recall that Mack used those bulldogs on its firetrucks (see below). I would also keep them. I've always felt that the blank side panels of the CA95 were begging for decor, and like how some vintage Benlys have a dealer name plate there. For me, I'm adding aftermarket 150 Honda badges to interrupt the emptiness, but if I had those bulldogs, I'd keep them. How cool. My own CA95 restoration is at a midpoint, where it's 100% disassembled. Given my wrist surgery last week and the icy Michigan weather, my project has slowed a bit, so I'm expecting a June completion. -Kevin 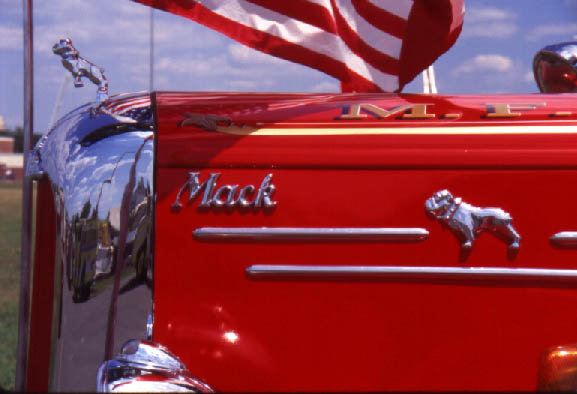
Last edited by ByTheLake; 12-18-2011 at 02:18 AM.
|
|
#4
12-18-2011, 03:50 AM
|
||||
|
||||
|
Quote:
Way off topic for this forum, but since Smithers also posts stuff about coffee makers, why not ... Your style of Bulldog side emblem showed up first in the Mack 'L' Series fire truck, which was made from 1940-1956. The same emblems were also on the 'B' Series, 1953-1966. The cab-forward style 'C' Series (1957-1967) still carried the same bulldog emblems but moved them back, since the doors were up front. The bulldog appeared on a few later Mack fire trucks but less often, and I believe Mack stopped making fire trucks around 1990. The dogs look perfect on your Benly, almost like they belong there. Great find. I wonder if a firefighter owned your bike? Last edited by ByTheLake; 12-18-2011 at 03:53 AM.
|
|
#5
12-18-2011, 09:26 AM
|
|||
|
|||
|
Noobens , great little bike . When I ride mine around I look like one of those carnival bears riding a bike so maybe bulldogs on the side covers are appropriate .
I assume since you pulled the cylinder and head you just wired the cam chain up in some manner . Yes you should pull the side cover and the stator, rotor to get to the cam chain . You should pull the cam chain tensioner arm and guide pulley . This will give you slack to join the cam chain and you'll make sure the cam to crank alignment is correct . It's cool that you have your own shop and I can see the equipment in the photos and I glad you tackle these older bikes to keep them going . Most of the franchise dealers won't work on bikes 10 years or older and heaven forbid you go to their parts dept. for anything !! It's forums on the internet that are keeping more people interested in older vehicles and guys like you that are willing to work on them that will keep everyone involved in our hobby and enjoyment of our bikes.
|
|
#6
12-18-2011, 06:26 PM
|
|||
|
|||
|
Yeah I like to say our shop motto is "No job too tough or bike too old." Most of the guys in town that can't do their own wrenching bring their vintage stuff to us. I honestly LOVE working on older stuff. We had a 1951 Cushman step through that came to us that had been to shops all over the place (the couple traveled from car show to car show and we had one in town this day). No one could get it running. I'm talking A LOT of shops! The husband treated me like a jerk when he dropped it off. We got it running again after a lot of head scratching and a VERY late night (the head mechanic and I were at the shop until about 2AM) and when they came to get it the next day and I drove it around front the husband was grinning from ear to ear and couldn't have been happier. I know he was only stand offish because I'm sure everyone he took it to thought they could it running and thought that we were just another one of THOSE shops haha!
But when you give someone back their pride and joy running properly there's really not much else that feels better! It makes me glad that the dealerships won't touch anything 10 years old. Most of the dealership mechanics in this town don't deserve to be working on classics anyway  I'm waiting on a 59 Honda to come in to the shop so I can make an offer on it!! Back on the topic at hand, I had actually removed the entire cam chain and with a few cuss words, a magnet, and a *little* patience, I was able to get it threaded back through the bottom end. I realize now this work was for naught haha. The REAL problem with trying to install it with the side cover on was getting the master link in. I almost got it through, but I became worried I was going to drop the link down into the bottom end. Last edited by Noobens; 12-18-2011 at 06:31 PM.
|
|
#7
12-21-2011, 11:39 PM
|
|||
|
|||
|
Got that pesky timing chain in today! Not sure if the timing is spot on. I called it a "night" at 6:00PM (which is our normal closing time. This time of year things are slow in Kansas so I get to tinker!) I wont' know until tomorrow if I timed it right. I ran it through by hand, and the valves aren't hitting the pistons. That's always a good sign!
I think it may have been Spokes or Smithers (can't find it again!) who suggested using the rear axle as the flywheel puller. KUDOS GENT(S)!!! I can't for the life of me remember how I got the last one off (I think I just used a bolt) but as I couldn't find a bolt to my liking I did end up using this, a rag stuffed in the starter gear, and a lot of muscle with a #3 Snap-On screw driver through the axle hole to get the flywheel off. I will say I've never quite encountered a master link needing the kind of finesse that the cam chain master link required. Tried it from several spots, and it was a continual pain. I finally had to concede defeat and ask my business partner (22 years of wrenching) to assist. Took him about 5 minutes. So is it hard? Did he get lucky? It's all up to speculation. The good news is that most of the motor is together. I still need to torque the head down (the head studs on my motor are ANOTHER story altogether....) but at least it's seemingly timed. A bonus to today's work: I thought I was missing the intake bit that bolts between the carb and the head. I don't know how it slipped my mind (maybe it's all the other things I'm missing?) but I do have it! So now I just need a carb. They seem to be worth their weight in gold. In all the time I've been looking I've seen ONE on eBay. If anyone has a spare, I'd be glad to buy it!!! Or trade for CB160 parts! I'll post pictures of the motor later today! Last edited by Noobens; 12-21-2011 at 11:42 PM.
|
|
#8
12-22-2011, 09:25 AM
|
|||
|
|||
|
If you use the rear wheel spindle as a puller, it comes off in less than 30 seconds.
Another thing to watch on re-assembly, looking from behind the motor, the head nut on the right of the row nearest you is a dome nut, the oil feed to the cam is under it. Sam.
Last edited by Sam Green; 12-22-2011 at 09:26 AM. Reason: spell
|
|
#9
12-22-2011, 10:03 AM
|
|||
|
|||
|
Quote:
|
|
#10
12-22-2011, 01:02 PM
|
|||
|
|||
|
Took your advice Sam Green and found the domed head bolt.
Now for my headache today... Thought the three holed washer went on the OUTSIDE of the cam gear. Timely mistake! Had to essentially back track through all the progress I made yesterday, take the flywheel and stator/starter gear assembly back apart, and re-do the cam chain; this time though, with the head attached to the motor. It was a little more tricky. I put a dab of locktite on the cam gear to keep the washer in place during the install. Here's the starting point:  I decided not to take the master link off until the gear was on. I don't know which way is easier, but it is doable this way. I kept the bottom side off of the crank gear though. For anyone who has to do this, it is best if you put the master link in the cam chain BEFORE wrapping it around the crank. This way you don't have to slide it in behind everything when you're trying to connect it. Without the tensioner in, it's not super hard, but have some patience. Here's how everything should look on the top side  After running through by hand (with the tensioner installed so that nothing slips), I put on the stator and starter gear assembly, and then put the flywheel/starter clutch on. (This is a mild pain if yours is like mine. I kept having the starter clutch wheels fall out while putting it on. A little waterproof grease helped.)  I ended up having to clean out the neutral contact on the shift drum with some fine sandpaper. I know it's still dirty, but I'll hopefully never see it again. And this is WORLDS cleaner than it was to begin with!!  Here's the clutch actuator (not sure what it's actually called) after a dip in the ultrasonic cleaner  There was some pretty nasty grease in it. After all, it had been sitting since the late 70s/early 80s! Got all the covers back on for a few shots!   I'd eventually like to get the side covers painted, but that's a job for another day. Also you will note the bolts holding the starter in are a little long. They're just a temp solution until I figure out what I did with the originals!! So really at this point, the motor is pretty much ready to go back in the bike. All I need to actually go down the road is a chain, tires and tubes, a little wiring, AND A CARBURETOR!
|
|
#11
12-22-2011, 02:56 PM
|
|||
|
|||
|
Good tires, tubes & strips can be found at: https://www.denniskirk.com/irc/rear-....prd/54368.sku
You can get 3.50 x 16 for that fatter look. They will be a close fit, but I have used them. Buy a #428 chain off of ebay. The bike will take around 115 link. Get a 120 link or so chain and cut it down. A carb will come up on ebay as well.
|
|
#12
12-22-2011, 03:22 PM
|
|||
|
|||
|
I get better prices on tires and tubes through my shop
 Dennis Kirk's pricing is pretty competitive (only about $1.00 more than we pay for them), but I can still get them cheaper and I don't have to pay the tire fee (not exactly sure what a tire fee is) or a shipping charge. Probably going to do a 3.0x16 and 3.5x16. I'd like to do the Cokers, as we're a distributor for them, but as everyone already knows, they're not available. I can get a brand new parts unlimited chain for under $10 as well. Dealer pricing is nice! Dennis Kirk's pricing is pretty competitive (only about $1.00 more than we pay for them), but I can still get them cheaper and I don't have to pay the tire fee (not exactly sure what a tire fee is) or a shipping charge. Probably going to do a 3.0x16 and 3.5x16. I'd like to do the Cokers, as we're a distributor for them, but as everyone already knows, they're not available. I can get a brand new parts unlimited chain for under $10 as well. Dealer pricing is nice!As for the carb, I've definitely been keeping my eye on eBay. There's a carb body on there right now that I may be able to swap some of the Honda parts I have now to make a full carb, but I'd rather find one complete. One hasn't come up for several months. The next one I'll definitely jump on! Right now I'm waiting for the first coat of JB to dry on the bottom of my gas tank. I was hoping I'd be able to cut the bottom out and weld it, but the metal is incredibly thin and the pinholes go up the curve on the bottom. It's also going to need to be KREEM'd. I sandblasted the paint off of the bottom and the pin holing was much worse than I had thought. Before I sandblasted all I could see was that there was a LOT of silicon sealer on the bottom. I was a little worried it would be so thin that the blasting media would create new holes, but luckily this was not the case. All of this tank work is a temp fix while I look for a reasonably priced used tank. Debating on whether or I should just strip the frame and send it off for paint now, or get the bike running first. I'd really like to disassemble everything, but I've already got my CB160 stripped down to the frame. I'm running out of room for parts buckets!! Last edited by Noobens; 12-22-2011 at 03:30 PM.
|
|
#13
12-22-2011, 03:28 PM
|
|||
|
|||
|
Noobs , great photos ! Hopefully along with the carb studs you also have the carb isolator . The domed nut on the right rear head stud should also have a copper crush washer as a seal .
And to all , a Happy Holidays !!!!!!!
|
|
#15
12-23-2011, 05:54 AM
|
||||
|
||||
|
Quote:
|
|
| Thread Tools | |
|
|


